Sunday, September 22, 2013

Tri-pods and Photoshopping


So everyone on pinterest always have these tutorials on how to make photos look good. I've never really looked at one, but after working on the picture I thought to myself, "I ain't too  bad for an armature right?"
Chris and I decided to buy ourselves a nice camera and tripod a while ago. Figured we'll save the money from taking professional pictures all the time. The prof's might disagree with me... but I don't think we do such a shabby job! So I thought I'd brag a little.

Wednesday, September 18, 2013

Nesting Anyone? How about DIY canvas paintings

So I'm getting rather pregnant. I probably should be packing my hospital bag... or finding a stroller... but of course those things don't have a chop saw in the process, so this is much more fun! I wanted to make these super cute paintings for the nursery (or as Chris and I have come to a peace-treaty of calling it the man-let cave). I came up with the idea a while ago, when I made a nursery board.
I decided to save myself some money and make/stretch my own canvases, instead of buying them. Especially since I wanted box framed (thicker) so that they would look awesome up on the wall without frames. I made them 2'x2', which turned out a lot bigger on the wall than I expected. A few 1x2's and some scrap 2x4's for the corners and I had me some frames.
A few screws in each corner and those suckers were solid. Only problem? They didn't exactly sit flat on the  wall. I shamefully didn't take pictures of how I fixed that problem, mainly because I was ashamed. Chris was surprised to find all 4 frames taking a nice soak in our bath tub, with dumbells keeping them sunk, one fine Sunday afternoon. After a good soak, I laid them on the flat garage floor with a flat large board sitting on top of them and loaded it up with lots of heavy things. Then let the heat of the Vegas day do the rest of the work. Tah-dah! Flat frames.
Stretching canvas is easy, nothing to be scared of. I've done it before with our 2nd year anniversary present.
 
Usually you'd use gesso to prime the canvas, but since these are more crafty type paintings and less masterpiece-ish I just used cheap white acrylic paint. And went to town drawing the animal silhouettes.
\
The grids make it super easy to get all the shapes and proportions right. It was really fun. I just use vine charcoal, and a little fixative when I'm done laying it out.
I painted the colors first, then went back with white paint to touch up and fill the animals in. It actually took A LOT longer than I was anticipating. I think just because the paintings were so big! 
And here they are hanging on the wall. I imagined them in a group with 2 on top and 2 on bottom (like the nursery board I made). But since I made the paintings so big, they wouldn't really fit like that. But I actually really like them taking up a whole wall. It really dresses up the room and makes it very fun!

Sunday, September 8, 2013

New House! And New Garage Shelves!

We've moved! And our new place is great. We are renting, so we'll see how these sets of projects turn out. I was afraid my creativity would be squished, but so far, I've got projects coming out my ears!

Project uno? More storage. We now have a tiny garage that we put up some shelving in. Let's talk about how this = awesome. It's so nice to have a place to put some of that stuff you need, but not very often.

Here is our lovely tiny garage. As you can see, there isn't much room for storage in there.

I used my friend Sketchup to model everything up. It really helps me when trying to figure out how many materials we will need.
We secured the horizontal braces to the ledger (back 2x4) before we hung it so that we could drill through the back way... you know what I mean? (actually we hung the ledger first, then realized we needed access to the back of the ledger first... whoops!) If you were using hangers on all the braces, then you could put the ledger up first.
The nice guys over at Home Depot ripped our OSB for us, and it fit perfectly! To avoid having to cut the OSB around the supports, we installed the OSB first.
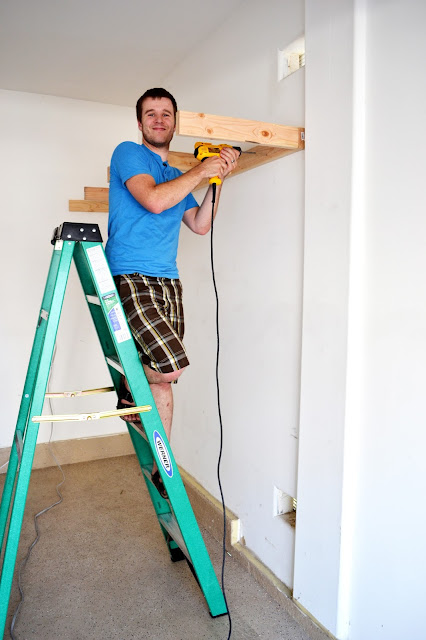
Install the front 2x4 and the shelf is all done! Other than it wouldn't hold much. (Hence husband holding shelf up?) I'm not sure what was going on here, but it's hot in Vegas, and especially hot in a garage, so I claim our brains were getting fried.
The back ledger was next, secured to the wall at every stud with screws. Then we used hangers at the top and bottom of the supports (cut at a 45ยบ) We used hangers here, because we really don't want the supports to rip off. Since they will be getting pulled from both directions.

We now have a lovely place to put all our junk! We're thinking it's the perfect place to hang our bikes. Great right?

Monday, July 15, 2013

VICTORY-Take that orange oak!

This battle has been going on for WAY too long. Here's when it all started. Chris shouldn't leave me alone. I get myself into trouble. So here's the progression:
Before:
During:
After:
You wouldn't believe the time and events that passed in between those three pictures. We had an internship in Nevada, signed a lease with renters, got through semesters of school, switched jobs, got pregnant... and I'm sure other things that I've forgotten at this moment.
One reason it took so long was trying to find the right color of stain. I had to have tried over 10 stains, like the ones above. My biggest problem was those dang sample pieces. They look great, but that's not how the stain looks on my door! There were so many that looked just like the stain I had just spent forever sanding off. So finally, my favoritest most favoritest Sherwin Williams told me they'd make me a custom stain that looked like the sample that I wanted it to look like when applied to my door. So I left the door overnight and they custom made me the perfect stain, for no extra cost. Heart Sherwin Williams.

So after picking up the door and the stain I prepared for the final battle. And Chris thought it would be funny to take a million pictures of me coming to get the camera. He got the "eye" after the smiley picture.

So I made him help me with the final sanding off of the yucky stains.
The cabinet only needed one coat of stain, and took 3 coats of polyeurothane (with sanding in between 220 grit). So the whole process took a couple of days. But I'm so happy with the result.


Tuesday, July 2, 2013

Revisiting Bali

So, some time ago, I was very bored. And decided my Balinese Dancer needed redoing. I don't do charcoal much, so I thought I should get some practice. I think she turned out pretty well. I was super nervous about the fabric on her dress (sha-shing!) turned out awesome. I was nervous about the fabric in the painting too, and it turned out great too. I was way happier with how her face turned out in this one though. She looks younger and more beautiful than she did in the painting. Bam. That's all.

Saturday, June 29, 2013

Take that Liquid Nails

Want to know how remove liquid nails from gypsum board, and finish it like a pro? We asked ourselves the same question and now I can now tell you how! I have to admit, Chris and I were a little worried about how it would look in the end. We REALLY didn't want to have a "looks like it was done by lame-o's" kind of a look. And our gypsum board had SUPER taken a beating from removing the panels and liquid nails. So we had our work cut out. But I can now say WE WERE VICTORIOUS!
Some places the liquid nails came off with the paneling. I used a utility knife to cut any loose paper (you don't want anything flopping around when you go to skim coat). We used the palm sander to take off all the liquid nails, careful to move quickly enough so the adjacent paint didn't get warm and goo-up. If you seriously are thinking of sanding off liquid nails,  you need to know, it is not going to be a quick process. It takes a long stinking time.
Chris was such a champ. He ended up doing most of the sanding (especially the ceiling, I didn't even touch that mess above my head). He'll tell you too, if you are going to be sanding above your head, you need some glasses. Drywall dust to the eye is very uncomfortable. The whole process creates quite a mess, which I would have left day to day (I'm a bad person). Chris always vacuumed up after. It probably took us a good 4 or 5 days (spread out because it was sucky) to get all the liquid nails off. So we would have had a mess for a long time if it were left to me!
For the patching we used Joint Compound instead of spackle. Spackle isn't made to skim coat. A thin coat went on first. Then I hand sanded with a sanding sponge to make sure it all blended in well. This technique also worked fabulous where paper was exposed. The paper kinda got all wrinkly from the moisture and made the patch on top all wrinkly too. After letting it dry, and sanding it flat, it was ready for another skim coat on top and looked great. Goodbye wrinkles!

The knock down texture I also created with the joint compound. (never used the can to do it, it probably works just fine, I just don't want to buy the can when I can do it myself). I just goobered up some globby-globs, and then using my drywall knife scraped across it to match the adjacent texture. Not too hard. Just took a couple minutes to figure it out.

The walls and ceiling turned out great! Some re-caulking happened where we had to rip it up with the panels. and we were ready to paint. We got the color matched at Sherwin Williams (cause they are the best and my absolute fave, and I go no where else). And just look at it. We aren't Lame-o's after all.

So liquid nails can come off. You might notice we took the chance to redo the top railing of the wainscot. We wanted something a little cleaner and not so rustic. I'm pretty happy with how it turned out.

Sunday, June 9, 2013

Baby Nursery Dreaming

So we are coming up on A LOT of changes around here. Chris is graduating, we are moving, and we are having a BABY! Its all very exciting, and overwhelming.... and I think it all might kill me. But it is still fun right? Well this morning I decided to have a little fun dreaming about our little baby boy. People keep asking me what I am going to do for the nursery, and honestly, I've put more thought into what kind of jogging stroller I want than how I am going to decorate. So I thought I might could dream a little in that area. Here's what I came up with. I love a warm turqoise-y blue. I love jungle animals (especially giraffes). And I have to admit, I like the chevron. I'm one of those chevron people right now I guess.

Good thing is, I think I've just come up with some really fun DIY ideas.
But first... I have to finish the bathroom....

Sunday, May 12, 2013

Changes and Spring Flowers

Well we are back. And we need to get our place ready to rent/sell. Since Chris is almost done with school it's time to face the inevitable... moving. Yuck. Plus I've really come to love our home. It will be hard to go. But getting past the mooshy stuff. I came home from work one day to find a surprise project by Chris. (I've surprised him multiple times... see here). But this was my first surprise. We knew it had to be done. I just hadn't started it. And what is it? The bathroom paneling and beams.


They are gone. I came home one day and Chris had already ripped it out. Which is great, because it needed to be done. I wish I could have gotten some pictures to show you why the paneling had to come out. Two words: the seams. It looked great when I first put it in, but with the heat and the moisture, those panels took a beating. So goodby panels and beams. Chris was happy to see them go.
We are now working on sanding off all the liquid nails (yuck, it takes forever). But it beats re-doing the gypsum board! We ditched the hand sanding and got the palm sander out quick.

Since our house is now a mess, and it is officially BE-A-UTIFUL outside, we obviously needed some happy flowers in the mix. Chris took me to my favorite nursery to pick out flowers for Mother's day. I have to say... that is one of my favorite activities of the year. I LOVE picking flowers out of the nursery. We are going to go broke if I ever get enough room to plant more flowers.

I tried to leave my flowers more room to grow than last year. I squished them in just a little too much. The little celosias (brain flowers) didn't make it. Oh... and do you notice the awesome cattle branding iron? That was a Christmas gift from Chris's grandmother. Bomb right? I love it. It doesn't have so much of a happy home here, but eventually we will find a good place for it.